How to Set Up a Litter-Robot
To set up a Litter-Robot, choose a level location, assemble the unit, add the right amount of litter, connect the power and app, then give your cat time to adjust. Keep the unit accessible and follow the model instructions before adding waste.
On this page (9 sections)
- What should you do before setting up a Litter-Robot?
- How do you assemble a Litter-Robot?
- How much litter should you add?
- How do you connect and test the unit?
- How do you help a cat adjust to a Litter-Robot?
- What should you check after the first cycle?
- What supplies can help with litter-box setup?
- How do you care for a new Litter-Robot?
- What is the correct order for setting up a Litter-Robot?
To set up a Litter-Robot, place it on a level floor, assemble the unit, add the recommended litter, connect power, and introduce it gradually to your cat. Keep the old box available during the transition if your cat is cautious.
This approach suits most homes because it treats setup as two jobs at once. The machine needs a stable position and correct assembly to work well, and your cat needs time to see the new box as a safe place to toilet.
Before starting, check the instructions for your exact model. The controls, app steps, litter guidance, and waste-drawer details can differ between versions, so use the manual for the unit in front of you rather than general steps from another model.
Choose a level spot with room to open the drawer and clean around the base. That early planning makes the first cycle easier to check, and it avoids moving a filled unit later, which can spill litter and unsettle your cat.
What should you do before setting up a Litter-Robot?
Choose the location before opening the unit for assembly. The best spot has a level floor, easy access to an outlet, and enough clearance to remove the waste drawer and clean around the machine.
Keep the unit in a quiet area where your cat can reach it without passing through a busy doorway. Avoid placing it directly beside food or water bowls.
Measure the space around the unit, including the area in front of the entry. Your cat needs room to approach, enter, turn, and leave without feeling trapped.
If you are replacing another automatic box, first review how to use a self cleaning cat litter box for general transition and daily-care guidance.
How do you assemble a Litter-Robot?
Assemble the base, globe, waste drawer, and litter-sifting parts in the order shown in the manual. Place each section firmly, but do not force a panel, latch, or connector into position.
Set the base on the final floor location before adding the upper parts. Moving a filled unit can spill litter or place stress on the assembled sections.
Check that the waste drawer closes fully and that removable parts sit evenly. A gap, loose panel, or misaligned drawer can affect operation.
Do a visual check around the entry and inside the globe. Remove packaging material, labels, or shipping pieces before your cat uses the box.
How do you set up a Litter-Robot 4?
For a Litter-Robot 4, follow the model-specific assembly and app instructions rather than assuming every Litter-Robot uses the same controls. The official Litter-Robot support center provides model guidance and troubleshooting resources.
Once the unit is assembled, connect the power cord as directed. If the model uses an app, install it and complete the account or device-pairing steps before relying on remote status information.
The guide to how to use a Litter-Robot 4 covers the next stage, including everyday use after the initial setup.
How much litter should you add?
Add the recommended litter type until it reaches the model's fill line or stated level. Do not fill above that point, because excess litter can spill or affect the sifting cycle.
Pour slowly into the globe and keep litter away from the base, power connection, and surrounding floor. Wipe up stray pieces before starting the first cycle.
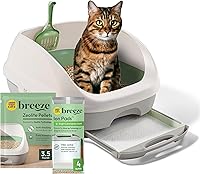
A new litter system can be easier to understand when you compare how different designs handle waste. The Purina Tidy Cats Breeze Cat Litter Box System Kit with Pellets & Pads uses Zeolite pellets and disposable Ion litter pads, with solid waste kept above the pads.
The kit's pellets are designed to let urine pass to the absorbent pads below, while the pads lock in moisture and odor for 7 days for one cat. It is an open box system rather than a rotating Litter-Robot, so choose it only if that style suits your cat and cleaning routine.
How do you connect and test the unit?
Connect power only after the unit is assembled and positioned. Keep the cord dry and make sure the waste drawer, globe, and other removable parts are seated as instructed.
Start the unit's setup or calibration process from the controls or app. Stay nearby during the first cycle so you can stop and inspect the machine if it makes an unusual sound or fails to move normally.
Check the status indicator or app connection after the cycle. A successful connection does not replace a physical check of the drawer, globe, entry, and litter level.
Don't place your cat inside a moving unit. Let the machine complete its cycle before introducing your cat to the entry.
How do you help a cat adjust to a Litter-Robot?
Introduce the Litter-Robot as a new litter box, not as a device your cat must use immediately. Leave the old box available and place the new unit near the familiar toilet area when practical.
Keep the new unit powered off during the first introduction only if the model instructions allow it. Let your cat sniff and enter freely, then follow the instructions for starting automatic cycles.
You can move a small amount of used litter into the new box to provide a familiar scent. Keep the box clean, but avoid strong scents or sudden litter changes during the transition.
Watch your cat's behavior. If your cat avoids the unit, returns to the old box, or has accidents, restore access to the familiar box and slow down the change.
What should you check after the first cycle?
Confirm that the unit completes a cycle, leaves the litter level usable, and closes the waste drawer securely. Check the floor around the base for spilled litter or moisture.
Make sure the entry remains clear and the machine does not rock on the floor. If the unit shifts during operation, stop and review its placement and assembly.
Keep the first few cycles supervised when possible. This helps you notice alignment, app, power, or drawer issues before the machine becomes your cat's only box.
Check the litter after the cycle too, because a usable level looks different by model. Leave the old box available until your cat uses the new one without hesitation, and slow the transition if you see avoidance or accidents.
For emptying guidance once the drawer begins to collect waste, see how to empty a Litter-Robot.
What supplies can help with litter-box setup?
Setup is easier when you have the correct litter, a small cleanup tool, and a clear area around the machine. Avoid adding accessories that block the entry or prevent the drawer from sliding out.
The PetSafe ScoopFree Disposable Crystal Litter Tray Refills are made for PetSafe ScoopFree self-cleaning cat litter boxes, not Litter-Robot units. Each tray is pre-filled with fresh-scent crystal litter and has a plastic lining designed to resist leaks.
These trays measure 22.99 x 15.39 x 7.5 in and contain 99% dust-free crystals according to the product information. They are a separate system, so do not place one in a Litter-Robot or treat it as a compatible refill.
For a simple enclosed alternative, Nature's Miracle Hooded Flip Top Cat Litter Box With Charcoal Filter has front-entry access, a hooded enclosure, and a built-in charcoal filter.
The box measures 25.13 x 19.13 x 11.75 in. Its flip-top front opening and simple latches are intended to make cleanup easier, but it does not replace the automatic cycling of a Litter-Robot.
How do you care for a new Litter-Robot?
Keep the entry, litter area, and waste drawer clean from the first day. Follow the model instructions for removing parts and cleaning the globe, base, sensors, and drawer.
Do not pour water into electrical sections or use a cleaner that the manual does not allow. Dry removable parts fully before reinstalling them.
When the unit needs a deeper clean, use how to clean a Litter-Robot 3 as a model-specific reference. Older and newer models may have different removal steps.
Check the waste drawer before it reaches capacity. If the app or indicator reports a full drawer when it is not, use how to fix a Litter-Robot 4 drawer full issue for troubleshooting steps.
What is the correct order for setting up a Litter-Robot?
Pick the location, assemble the unit, add the right litter, connect power, run a test cycle, and introduce your cat slowly. Keep the old box available until your cat uses the new one consistently.
Choose a level, accessible area if your priority is reliable entry and easy maintenance. Keep the old box longer if your cat is cautious, and check the drawer, litter level, and cycle after the first few uses.
For the smoothest setup, follow the exact manual for your model and treat the transition as a gradual change. The best Litter-Robot routine starts with a stable location and continues with regular emptying and cleaning.
Frequently asked questions
Where should you place a Litter-Robot?
Place the Litter-Robot on a level, stable floor with enough open space for your cat to enter and turn around. Keep it near the area your cat already uses when possible, but leave room to remove the waste drawer, clean the unit, and connect the power cord safely.
What litter should you use in a Litter-Robot?
Use the litter type and fill level recommended for your Litter-Robot model. Add litter only to the marked level, because too much can affect the sifting cycle.
Avoid changing litter, location, and routine all at once while your cat is learning the new box.
How long does it take a cat to use a new Litter-Robot?
Some cats use a new Litter-Robot quickly, while others need a gradual introduction. Leave the old box available at first, keep the new unit powered off if the instructions allow it, and move forward after your cat enters and uses the unit comfortably.
Should you leave the old litter box out during setup?
Yes, leaving the old litter box nearby can make the change less stressful for a cautious cat. Once your cat uses the Litter-Robot consistently, remove the old box gradually.
Watch for avoidance, accidents, or signs of discomfort and slow the transition if needed.